Kitchenaid dishwashers can provide the required level of tightness when washing kitchen utensils. However, they also have various problems associated with the flow of water onto the floor in the kitchen. There are many reasons why a KitchenAid dishwasher might leak. It is good for their users to know why the dishwasher of this brand can leak.
Most likely the water inlet valve in the Kitchenaid dishwasher is faulty. This reason is more likely than any other. Apparently, the damper did not close due to the lack of a signal from the water level sensor. A constant increase in the water level leads to overflow of the hopper and leakage of the dishwasher. A common source of water on the kitchen floor is the gaskets on the diverter and unit door. Do not exclude damage to the drain pump hose.
It would be nice to understand the possible causes of a leaky Kitchenaid dishwasher and think about how you can fix them yourself.
Water inlet valve failure
In the Kitchenaid dishwasher, the water inlet valve (or filling valve) acts as a shut-off element. It provides the filling of water into the hopper of the device and the timely termination of its supply. After selecting the program and turning on the dishwasher, the solenoid valve, at the signal of the control module, attracts the stem, thereby opening the membrane through which water from the high-pressure water supply begins to flow into the machine. When filling the hopper to the desired level, the valve closes the membrane, stopping the flow of water. For the entire time of washing dishes, this process can be repeated several times, depending on the selected program.
The reason for the failure of the filling valve is usually a malfunction with the mechanical part or electronics. In all Kitchenaid dishwashers, the water inlet valve is located at the bottom of the appliance behind a removable door panel. Therefore, situations, where the machine is leaking from under the door, may be associated with a malfunction such as a broken water supply valve.
The reasons for the failure of this element may be:
- Violation of the integrity of the membrane;
- Wear the part itself.
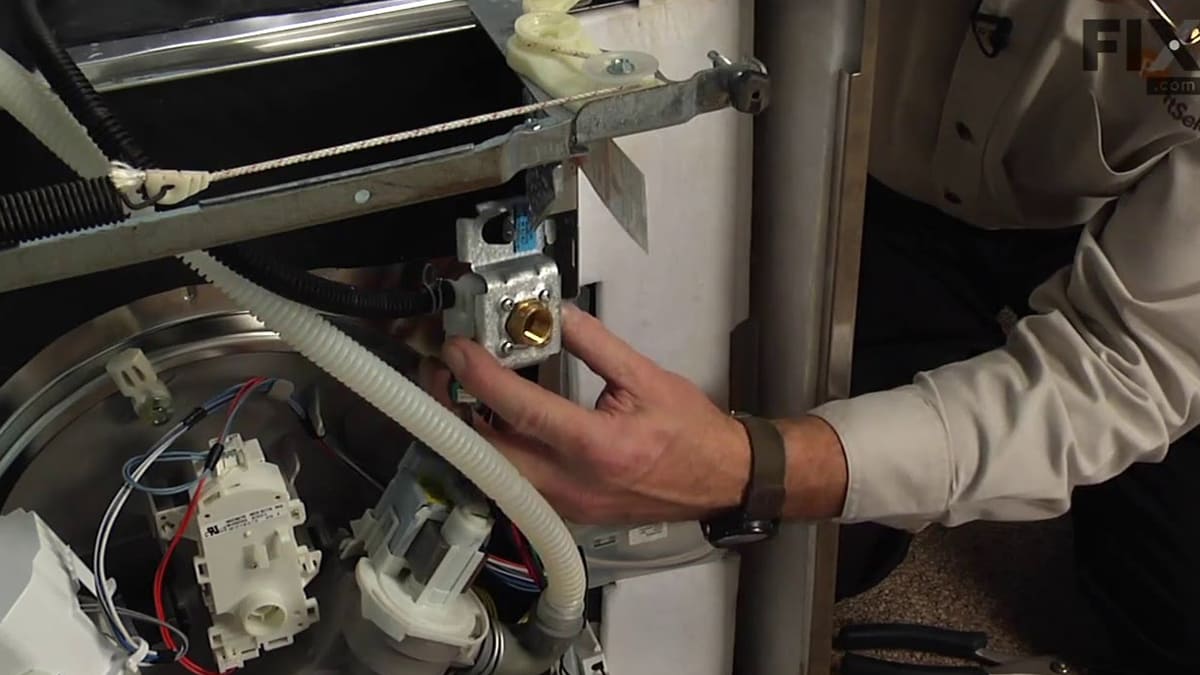
The membrane cannot be replaced, which means that the filling valve itself will have to be replaced. You can do this after gaining access to the part. As mentioned, it is located at the bottom of the instrument housing behind a removable door panel. To get to the filling valve itself, do the following:
- Remove the front panel by unscrewing the fixing bolts and releasing its latches.
- We find the water supply valve at the bottom of the device body.
- Disconnect the inlet hose from the valve. We remove the fittings that connect the part to the dishwasher.
- Tilt the intake valve down to disconnect the electrical harness from the solenoid assembly.
- We take out the faulty valve. We install a new one in its place.
- We connect it to all elements in reverse order.
- Finally, we attach an inlet hose and an electrical harness to it.
Worn diverter motor seal
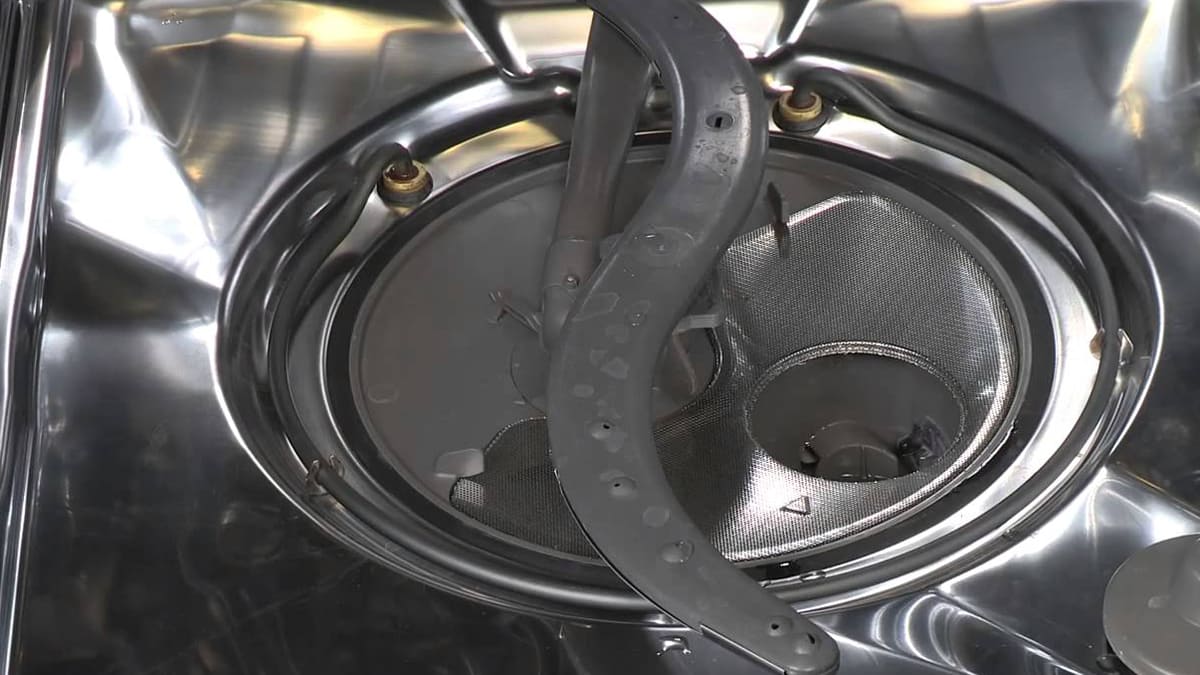
The Kitchenaid dishwasher is equipped with two or three impellers (water sprinklers). The water sprayed with the help of the impellers wash off the dirt from the dishes. The diverter is responsible for the distribution of water between the impellers. This small complex mechanism consists of a rotating disk, a distributor motor and an orifice drive. The engine is connected to the impeller fitting, and controls the water supply. The use of rubber seals (cuffs) allows you to achieve reliable sealing of the connection. This is the best way to prevent water from seeping onto the floor.
Over time, the seals at the junction of the water supply channel and the impellers lose their properties, wear out, harden and crack. As a result, water partially or completely does not enter the atomizers, but flows around them. The rotation of the atomizer deteriorates or stops completely, and the dishes remain dirty. Wear on the sealing collar around the motor rod causes the dishwasher to leak.
If the seals are really worn out, they must be replaced with new ones. To access them, you will need to do the following:
- remove the diverter that distributes water between the impellers;
- on the removed mechanism, open the outlet cover, under which there is a sealing cuff. It should be put on a white plastic rod;
- We replace the worn gasket with a new one. When replacing, put on the cuff with the flat side down. The seal has a flat side and an open side. The flat part should be facing down when you push the seal into place;
- close the outlet cover and install the mechanism in its original place in the reverse order.
Damaged door seal
In any kitchen appliances that use water to ensure the tightness of the inner chamber, there are seals. The presence of a seal around the door is also a requirement for the Kitchenaid dishwasher.
The seal ensures the tightest fit of the appliance door when closing. A self-adhesive rubber gasket is used as a seal. It prevents water from leaking around the perimeter of the door while washing dishes.
When loading kitchen utensils with sharp edges into the hopper, the rubber seal is easily damaged. In addition, due to frequent contact with hot water, rubber wears out, hardens and cracks, therefore it loses its properties and begins to leak moisture.

Untimely cleaning of the seal can also lead to a similar problem. Remains of food and fatty layers will not allow the rubber to fit snugly to the body. If there is a lot of debris, the door may not close and the wash cycle may not start. The control module will not start the program due to the absence of a signal to close the door.
There is nothing complicated in replacing the seal. Therefore, you can eliminate the possible cause of the leak yourself. To do this, you need to do the following:
- The appliance must be disconnected from the power supply and water supply.
- Open the PMM door fully to remove all baskets, trays and shelves.
- Grab the top gasket with two fingers to pull it out of the recess.
- Clean the vacated recess from dirt with a cotton swab and dry with a dry cloth.
- Lay a new gasket over the clean recess.
- To replace the bottom seal, use a screwdriver to unscrew the fixing bolts holding the PMM front panel. Release its latches and set aside.
- The lower rubber band is deeper than the upper one. Therefore, it is more convenient to get it with tweezers.
- Use a cotton swab to clean the freed recess.
- Using the same tweezers, push the new tourniquet into it until it stops.
- Reinstall the front panel and close the PMM door.
Leave the door closed for several hours so that the new seal is well-fixed.
Leak due to drain pump or hose
The drain or drain pump is responsible for draining the water during the dishwashing process. Therefore, in the event of a breakdown, it can cause water leakage from the PMM. A faulty drain pump can be identified using diagnostics. The leakage of the dishwasher due to the drain pump is caused by worn seals, and clogged impellers, but most often damage or poor fastening of the drain hose. All these parts of the drain pump in the Kitchenaid dishwasher can be bought and replaced by yourself. To do this, you need to do the following:
- The dishwasher must be de-energized and disconnected from the water supply.
- Lay the housing on its side to make it easier to remove the bottom panel, behind which is the drain pump.
- Having reached the pump, loosen the clamp and remove the drain hose.
- Having disconnected the electrical connectors, we take out the pump.
- After replacing the defective parts, install the pump in its original place.
- We fix the new drain hose with a clamp.
- Replace the bottom panel and raise the PMM.
Conclusion
The ability to properly understand the causes of a leaking Kitchenaid washing machine and knowing how to fix them will allow you not to empty your wallet in vain.